At the end of the last post, I left progress on a cliff-hanger. My dad and I had managed to cover the building with most of the wood sheeting (called Oriented Strand Board - OSB) needed for the structural layer of the roof, but with winter fast approaching, it would not be long before prolonged rainfall or frost would ruin the OSB if left exposed. We had to act fast to get the full roof construction, especially the weatherproof rubber layer, on top.
After my dad headed back to Suffolk after a hard weekend of work, there was a stretch of four days of dry weather. This meant that everything could dry out from the wet weekend, and the rest of the roof construction could be completed without moisture getting trapped within. Of course, the weather forecast also said that it would rain on the Friday and we probably wouldn't get another long dry spell again for some time. So the Thursday of that week would be the day of reckoning. Marta and I took the day off from our regular jobs with the primary aim of getting the rubber covering on top of the constructed roof.
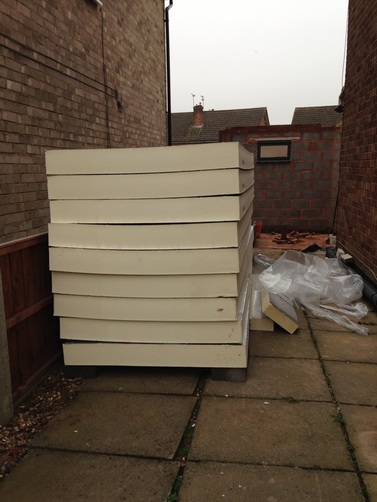
As I explained in the last post, the roof is constucted of a structural OSB layer that sits on the roof joists, but to keep the inside warm, insulation is required. We used 150 mm thick insulation which was to be glued to the first structural OSB layer. Here is a stack of our insulation after being delivered:
After my dad headed back to Suffolk after a hard weekend of work, there was a stretch of four days of dry weather. This meant that everything could dry out from the wet weekend, and the rest of the roof construction could be completed without moisture getting trapped within. Of course, the weather forecast also said that it would rain on the Friday and we probably wouldn't get another long dry spell again for some time. So the Thursday of that week would be the day of reckoning. Marta and I took the day off from our regular jobs with the primary aim of getting the rubber covering on top of the constructed roof.
As I explained in the last post, the roof is constucted of a structural OSB layer that sits on the roof joists, but to keep the inside warm, insulation is required. We used 150 mm thick insulation which was to be glued to the first structural OSB layer. Here is a stack of our insulation after being delivered:
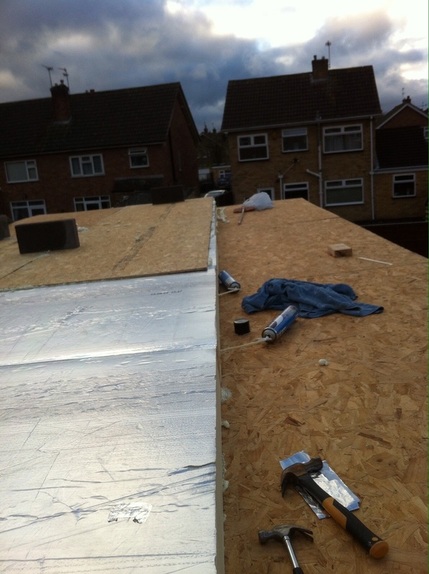
On top of this insulation layer goes another layer of OSB (11 mm thick this time, whereas the first layer was 18 mm thick), and then the rubber membrane is glued on top of this.
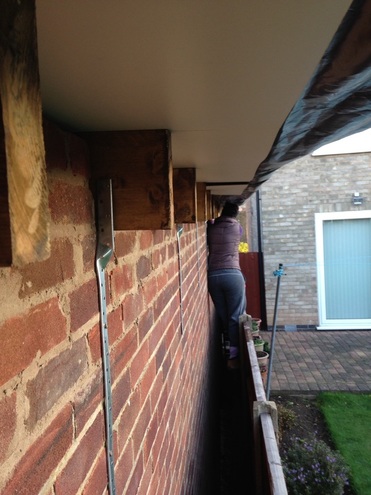
We arose at 7am to make the most of the daylight (the days started to get pretty short in November if you hadn't noticed). The first job was to align all the joists more precisely to save on trimming them later. This meant unscrewing some of our wall tie brackets, knocking the joists to the correct position, and then reattaching the brackets. Marta went ahead and unscrewed - I knocked and re-screwed (and took photos):
We arose at 7am to make the most of the daylight (the days started to get pretty short in November if you hadn't noticed). The first job was to align all the joists more precisely to save on trimming them later. This meant unscrewing some of our wall tie brackets, knocking the joists to the correct position, and then reattaching the brackets. Marta went ahead and unscrewed - I knocked and re-screwed (and took photos):
We then had to fix down the first layer of OSB to the joists. Some of the OSB sheets first needed adjustment (trimming with a circular saw) to ensure they were sitting accurately on the joists, then both Marta and I went around hammering nails through the board and into the joists. Despite forgetting to take any photos of this stage, I think it contributed siginifcantly to Marta's later remarks calling this whole day the hardest she has worked in her life. We hammered over 150 three-inch nails - the roof was going nowhere. By now it was about midday.
With the structural board fixed down, the next stage was to glue down the insulation sheets. We used a expanding foam grab adhesive called Instastik - a little pricey at £11 a can (we ended up using about 6 cans), but it did a good job and was much cheaper than the alternative which was to use long screw fixings that would go all the way through the roof construction into the joists. To me, the long screws seemed an obvious route for heat loss, so I opted for the fully adhered approach. Here we are about half way through glueing the insulation (around 2pm):
With the structural board fixed down, the next stage was to glue down the insulation sheets. We used a expanding foam grab adhesive called Instastik - a little pricey at £11 a can (we ended up using about 6 cans), but it did a good job and was much cheaper than the alternative which was to use long screw fixings that would go all the way through the roof construction into the joists. To me, the long screws seemed an obvious route for heat loss, so I opted for the fully adhered approach. Here we are about half way through glueing the insulation (around 2pm):
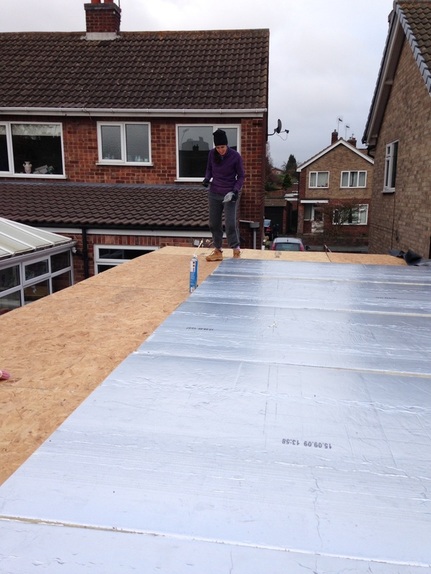
Once the majority of the insulation was down we began to stick the second layer of OSB board on top of the insulation. This layer is used to provide a surface on which to glue the final rubber layer. It was at the stage below that we ran out of adhesive, and Marta had to drive to Screwfix to stock up:
As you can see, we had about two-thirds of the roof covered with insulation. Whilst Marta had popped to the shop, I cut some insulation boards to the correct size to fill the remaining space.
You might also notice that at this point it was also getting uncomfortably dark considering we were some way away from getting the rubber membrane on top of the roof. It was about 2.45pm. Sunset was scheduled for 4.30pm.
The next big task had to be to get the rubber from the ground to on top of the roof. The rubber sheet came as one piece, and keeping it this way means that we reduce risk of leaks at joins. It measured 11 metres long by 4 metres wide and was delievered folded up into a bag about 1 metre long, weighing around 100 kilograms. To get it on to a roof 3 metres high was certainly a challenge and required a brother-in-law. Marta's brother Lu was off to a meeting at 3.30pm so we had to use his help whilst he was still around before finishing the glueing of the remaining insulation.
Between us we devised the biggest health and safety risk in Loughborough for a 20 minute period. It did the job. The moment below captured the jubilation of victory, but also, our precarious solution:
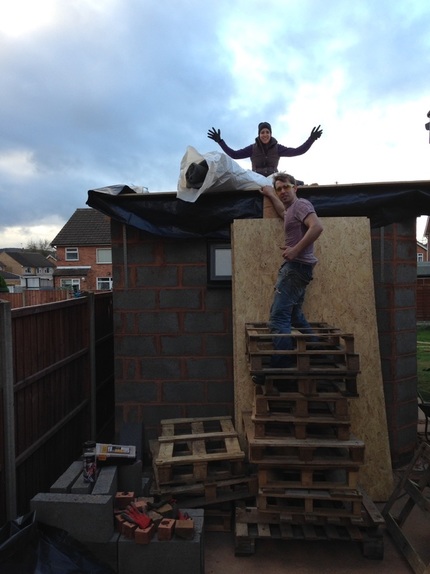
We had stacked a load of pallets to an unsafe height and between Lu and I managed to hoist the rubber bag up to this intermediate level. Then we stood the rubber bag on its end and gave a mighty heave to push it up and over the roof edge with Marta pulling from the top. Thankfully Lu was able to take the picture above, after coming close to being buried by a pile of pallets. As you can see by the positioning of my legs within the pallet stack - any toppling of the pallets would also surely have done bad things to my shins.
Anyway, we got the rubber up there and it was now 3.15pm.
We returned to sticking down the remaining insulation and second layer of board on top, on all apart from one small section closest to the house. This would require more cutting to size, and with time running out, we decided we could leave this for now and still attempt to cover over with the rubber before the end of the day. But by now it was 4.30pm. Sunset.
As panic set in, we worked like never before, and admittedly, there was no time (or light) for informative photos. We had to unfold the rubber, cover the whole roof and weigh it down to stop it blowing away in the big storms predicted over the coming weeks. Of course at this time what we didn't want was a convoluted folding scheme to decipher in order to unfold the rubber in a sensible way. But this is what we got. So there we were, now at 5pm, on top of the roof in the pitch black, on the phone to the guy who sold us the rubber over the internet, explaining how best to unfold it. We managed to figure it out, but as we worked quickly, everything became a blur - even the photos:
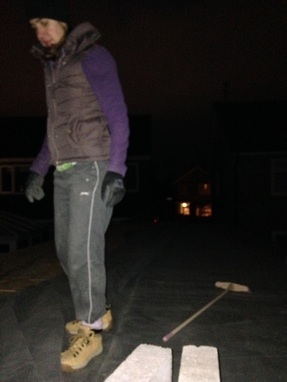 | 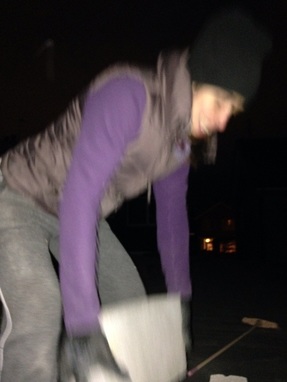 |
I was getting heavy blocks up on to the roof and Marta was carrying them to position to weigh down the rubber. Finally, we secured the overhanging edges of the rubber to the sides of the roof joists with some wood and screws to stop the rubber flapping around in the wind
We weren't really sure how, but by the end of the day, we had a suspicion that we had achieved our objective. We arose the next morning to this glorious sight:
We weren't really sure how, but by the end of the day, we had a suspicion that we had achieved our objective. We arose the next morning to this glorious sight:
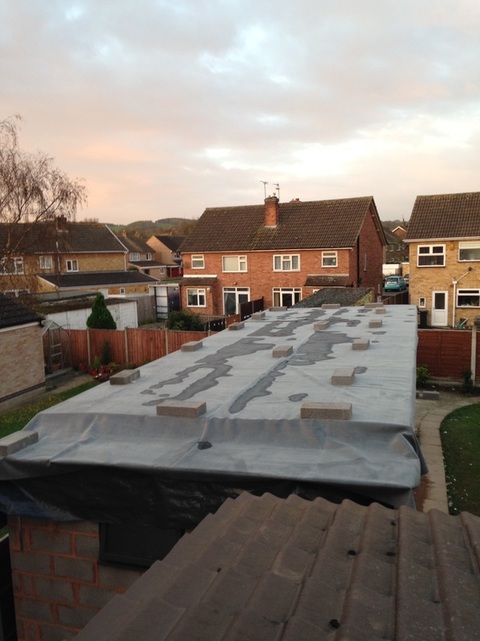
Ok, it may not be glorious to many people, but this represented progress. And as you can see from the above photo, it rained that night, so we really could not have left it any longer.
So, still some work to do to finish the roof, but that could wait for the following weekends.
As Marta contemplated her hardest day of work....on the floor....clutching her legs in agony....I think she was very happy to have contributed in a major way to making a home for her mum.
Check back soon for more progress before Christmas.